Implementing Conway's Game of Life
Design
Before we dive in, we have some design choices to consider.
Infinite Universe
The Game of Life is played in an infinite universe, but we do not have infinite memory and compute power. Working around this rather annoying limitation usually comes in one of three flavors:
-
Keep track of which subset of the universe has interesting things happening, and expand this region as needed. In the worst case, this expansion is unbounded and the implementation will get slower and slower and eventually run out of memory.
-
Create a fixed-size universe, where cells on the edges have fewer neighbors than cells in the middle. The downside with this approach is that infinite patterns, like gliders, that reach the end of the universe are snuffed out.
-
Create a fixed-size, periodic universe, where cells on the edges have neighbors that wrap around to the other side of the universe. Because neighbors wrap around the edges of the universe, gliders can keep running forever.
We will implement the third option.
Interfacing Rust and JavaScript
⚡ This is one of the most important concepts to understand and take away from this tutorial!
JavaScript's garbage-collected heap — where Objects, Arrays, and DOM nodes
are allocated — is distinct from WebAssembly's linear memory space, where our
Rust values live. WebAssembly currently has no direct access to the
garbage-collected heap (as of April 2018, this is expected to change with the
"Interface Types" proposal). JavaScript, on the other hand, can
read and write to the WebAssembly linear memory space, but only as an
ArrayBuffer of scalar values (u8, i32, f64,
etc...). WebAssembly functions also take and return scalar values. These are the
building blocks from which all WebAssembly and JavaScript communication is
constituted.
wasm_bindgen defines a common understanding of how to work with compound
structures across this boundary. It involves boxing Rust structures, and
wrapping the pointer in a JavaScript class for usability, or indexing into a
table of JavaScript objects from Rust. wasm_bindgen is very convenient, but it
does not remove the need to consider our data representation, and what values
and structures are passed across this boundary. Instead, think of it as a tool
for implementing the interface design you choose.
When designing an interface between WebAssembly and JavaScript, we want to optimize for the following properties:
-
Minimizing copying into and out of the WebAssembly linear memory. Unnecessary copies impose unnecessary overhead.
-
Minimizing serializing and deserializing. Similar to copies, serializing and deserializing also imposes overhead, and often imposes copying as well. If we can pass opaque handles to a data structure — instead of serializing it on one side, copying it into some known location in the WebAssembly linear memory, and deserializing on the other side — we can often reduce a lot of overhead.
wasm_bindgenhelps us define and work with opaque handles to JavaScriptObjects or boxed Rust structures.
As a general rule of thumb, a good JavaScript↔WebAssembly interface design is often one where large, long-lived data structures are implemented as Rust types that live in the WebAssembly linear memory, and are exposed to JavaScript as opaque handles. JavaScript calls exported WebAssembly functions that take these opaque handles, transform their data, perform heavy computations, query the data, and ultimately return a small, copy-able result. By only returning the small result of the computation, we avoid copying and/or serializing everything back and forth between the JavaScript garbage-collected heap and the WebAssembly linear memory.
Interfacing Rust and JavaScript in our Game of Life
Let's start by enumerating some hazards to avoid. We don't want to copy the whole universe into and out of the WebAssembly linear memory on every tick. We do not want to allocate objects for every cell in the universe, nor do we want to impose a cross-boundary call to read and write each cell.
Where does this leave us? We can represent the universe as a flat array that
lives in the WebAssembly linear memory, and has a byte for each cell. 0 is a
dead cell and 1 is a live cell.
Here is what a 4 by 4 universe looks like in memory:

To find the array index of the cell at a given row and column in the universe, we can use this formula:
index(row, column, universe) = row * width(universe) + column
We have several ways of exposing the universe's cells to JavaScript. To begin,
we will implement std::fmt::Display for Universe, which we can
use to generate a Rust String of the cells rendered as text characters. This
Rust String is then copied from the WebAssembly linear memory into a JavaScript
String in the JavaScript's garbage-collected heap, and is then displayed by
setting HTML textContent. Later in the chapter, we'll evolve this
implementation to avoid copying the universe's cells between heaps and to render
to <canvas>.
Another viable design alternative would be for Rust to return a list of every cell that changed states after each tick, instead of exposing the whole universe to JavaScript. This way, JavaScript wouldn't need to iterate over the whole universe when rendering, only the relevant subset. The trade off is that this delta-based design is slightly more difficult to implement.
Rust Implementation
In the last chapter, we cloned an initial project template. We will modify that project template now.
Let's begin by removing the alert import and greet function from
wasm-game-of-life/src/lib.rs, and replacing them with a type definition for
cells:
# #![allow(unused_variables)]
#fn main() {
#[wasm_bindgen]
#[repr(u8)]
#[derive(Clone, Copy, Debug, PartialEq, Eq)]
pub enum Cell {
    Dead = 0,
    Alive = 1,
}
#}
It is important that we have #[repr(u8)], so that each cell is represented as
a single byte. It is also important that the Dead variant is 0 and that the
Alive variant is 1, so that we can easily count a cell's live neighbors with
addition.
Next, let's define the universe. The universe has a width and a height, and a
vector of cells of length width * height.
# #![allow(unused_variables)]
#fn main() {
#[wasm_bindgen]
pub struct Universe {
    width: u32,
    height: u32,
    cells: Vec<Cell>,
}
#}
To access the cell at a given row and column, we translate the row and column into an index into the cells vector, as described earlier:
# #![allow(unused_variables)]
#fn main() {
impl Universe {
    fn get_index(&self, row: u32, column: u32) -> usize {
        (row * self.width + column) as usize
    }

    // ...
}
#}
In order to calculate the next state of a cell, we need to get a count of how
many of its neighbors are alive. Let's write a live_neighbor_count method to
do just that!
# #![allow(unused_variables)]
#fn main() {
impl Universe {
    // ...

    fn live_neighbor_count(&self, row: u32, column: u32) -> u8 {
        let mut count = 0;
        for delta_row in [self.height - 1, 0, 1].iter().cloned() {
            for delta_col in [self.width - 1, 0, 1].iter().cloned() {
                if delta_row == 0 && delta_col == 0 {
                    continue;
                }

                let neighbor_row = (row + delta_row) % self.height;
                let neighbor_col = (column + delta_col) % self.width;
                let idx = self.get_index(neighbor_row, neighbor_col);
                count += self.cells[idx] as u8;
            }
        }
        count
    }
}
#}
The live_neighbor_count method uses deltas and modulo to avoid special casing
the edges of the universe with ifs. When applying a delta of -1, we add
self.height - 1 and let the modulo do its thing, rather than attempting to
subtract 1. row and column can be 0, and if we attempted to subtract 1
from them, there would be an unsigned integer underflow.
Now we have everything we need to compute the next generation from the current
one! Each of the Game's rules follows a straightforward translation into a
condition on a match expression. Additionally, because we want JavaScript to
control when ticks happen, we will put this method inside a #[wasm_bindgen]
block, so that it gets exposed to JavaScript.
# #![allow(unused_variables)]
#fn main() {
/// Public methods, exported to JavaScript.
#[wasm_bindgen]
impl Universe {
    pub fn tick(&mut self) {
        let mut next = self.cells.clone();

        for row in 0..self.height {
            for col in 0..self.width {
                let idx = self.get_index(row, col);
                let cell = self.cells[idx];
                let live_neighbors = self.live_neighbor_count(row, col);

                let next_cell = match (cell, live_neighbors) {
                    // Rule 1: Any live cell with fewer than two live neighbours
                    // dies, as if caused by underpopulation.
                    (Cell::Alive, x) if x < 2 => Cell::Dead,
                    // Rule 2: Any live cell with two or three live neighbours
                    // lives on to the next generation.
                    (Cell::Alive, 2) | (Cell::Alive, 3) => Cell::Alive,
                    // Rule 3: Any live cell with more than three live
                    // neighbours dies, as if by overpopulation.
                    (Cell::Alive, x) if x > 3 => Cell::Dead,
                    // Rule 4: Any dead cell with exactly three live neighbours
                    // becomes a live cell, as if by reproduction.
                    (Cell::Dead, 3) => Cell::Alive,
                    // All other cells remain in the same state.
                    (otherwise, _) => otherwise,
                };

                next[idx] = next_cell;
            }
        }

        self.cells = next;
    }

    // ...
}
#}
So far, the state of the universe is represented as a vector of cells. To make
this human readable, let's implement a basic text renderer. The idea is to write
the universe line by line as text, and for each cell that is alive, print the
Unicode character ◼ ("black medium square"). For dead cells, we'll print ◻
(a "white medium square").
By implementing the Display trait from Rust's standard library, we can add a
way to format a structure in a user-facing manner. This will also automatically
give us a to_string method.
# #![allow(unused_variables)]
#fn main() {
use std::fmt;

impl fmt::Display for Universe {
    fn fmt(&self, f: &mut fmt::Formatter) -> fmt::Result {
        for line in self.cells.as_slice().chunks(self.width as usize) {
            for &cell in line {
                let symbol = if cell == Cell::Dead { '◻' } else { '◼' };
                write!(f, "{}", symbol)?;
            }
            write!(f, "\n")?;
        }

        Ok(())
    }
}
#}
Finally, we define a constructor that initializes the universe with an
interesting pattern of live and dead cells, as well as a render method:
# #![allow(unused_variables)]
#fn main() {
/// Public methods, exported to JavaScript.
#[wasm_bindgen]
impl Universe {
    // ...

    pub fn new() -> Universe {
        let width = 64;
        let height = 64;

        let cells = (0..width * height)
            .map(|i| {
                if i % 2 == 0 || i % 7 == 0 {
                    Cell::Alive
                } else {
                    Cell::Dead
                }
            })
            .collect();

        Universe {
            width,
            height,
            cells,
        }
    }

    pub fn render(&self) -> String {
        self.to_string()
    }
}
#}
With that, the Rust half of our Game of Life implementation is complete!
Recompile it to WebAssembly by running wasm-pack build within the
wasm-game-of-life directory.
Rendering with JavaScript
First, let's add a <pre> element to wasm-game-of-life/www/index.html to
render the universe into, just above the <script> tag:
<body>
  <pre id="game-of-life-canvas"></pre>
  <script src="./bootstrap.js"></script>
</body>
Additionally, we want the <pre> centered in the middle of the Web page. We can
use CSS flex boxes to accomplish this task. Add the following <style> tag
inside wasm-game-of-life/www/index.html's <head>:
<style>
  body {
    position: absolute;
    top: 0;
    left: 0;
    width: 100%;
    height: 100%;
    display: flex;
    flex-direction: column;
    align-items: center;
    justify-content: center;
  }
</style>
At the top of wasm-game-of-life/www/index.js, let's fix our import to bring in
the Universe rather than the old greet function:
import { Universe } from "wasm-game-of-life";
Also, let's get that <pre> element we just added and instantiate a new
universe:
const pre = document.getElementById("game-of-life-canvas");
const universe = Universe.new();
The JavaScript runs in a requestAnimationFrame
loop. On each iteration, it draws the current universe
to the <pre>, and then calls Universe::tick.
const renderLoop = () => {
  pre.textContent = universe.render();
  universe.tick();

  requestAnimationFrame(renderLoop);
};
To start the rendering process, all we have to do is make the initial call for the first iteration of the rendering loop:
requestAnimationFrame(renderLoop);
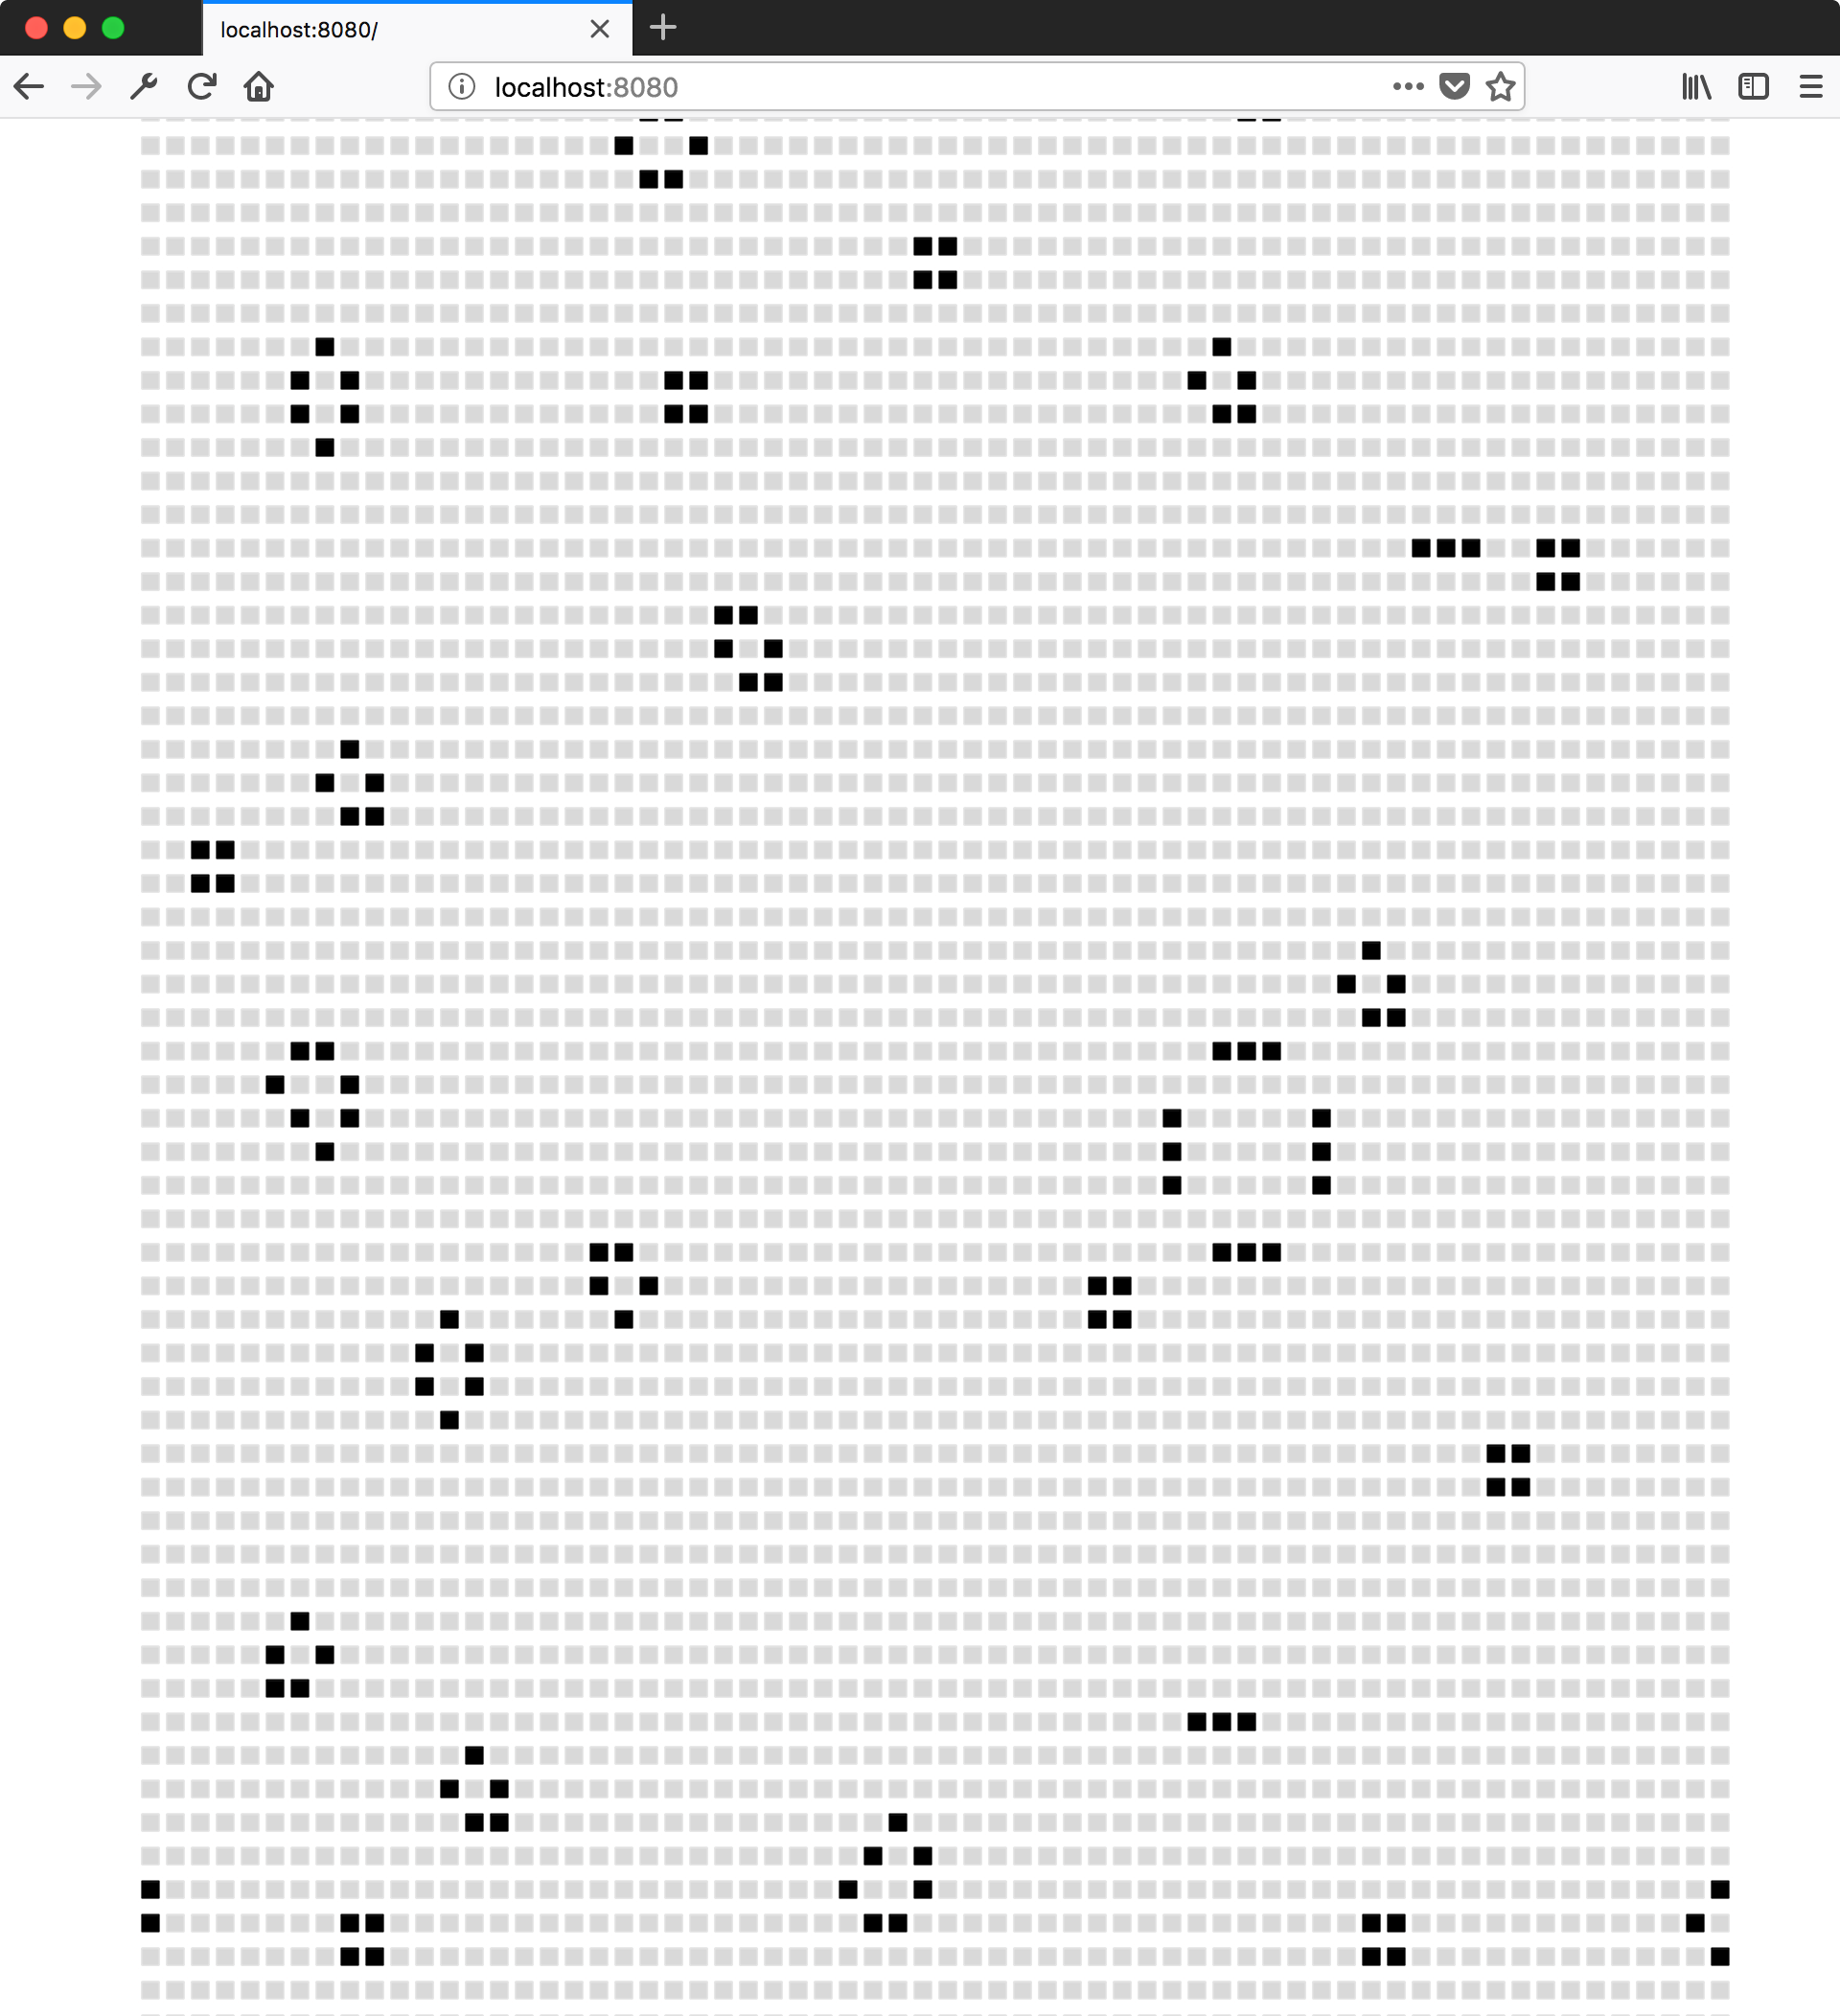
Make sure your development server is still running (run npm run start inside
wasm-game-of-life/www) and this is what
http://localhost:8080/ should look like:
Rendering to Canvas Directly from Memory
Generating (and allocating) a String in Rust and then having wasm-bindgen
convert it to a valid JavaScript string makes unnecessary copies of the
universe's cells. As the JavaScript code already knows the width and
height of the universe, and can read WebAssembly's linear memory that make up
the cells directly, we'll modify the render method to return a pointer to the
start of the cells array.
Also, instead of rendering Unicode text, we'll switch to using the Canvas API. We will use this design in the rest of the tutorial.
Inside wasm-game-of-life/www/index.html, let's replace the <pre> we added
earlier with a <canvas> we will render into (it too should be within the
<body>, before the <script> that loads our JavaScript):
<body>
  <canvas id="game-of-life-canvas"></canvas>
  <script src='./bootstrap.js'></script>
</body>
To get the necessary information from the Rust implementation, we'll need to add
some more getter functions for a universe's width, height, and pointer to its
cells array. All of these are exposed to JavaScript as well. Make these
additions to wasm-game-of-life/src/lib.rs:
# #![allow(unused_variables)]
#fn main() {
/// Public methods, exported to JavaScript.
#[wasm_bindgen]
impl Universe {
    // ...

    pub fn width(&self) -> u32 {
        self.width
    }

    pub fn height(&self) -> u32 {
        self.height
    }

    pub fn cells(&self) -> *const Cell {
        self.cells.as_ptr()
    }
}
#}
Next, in wasm-game-of-life/www/index.js, let's also import Cell from
wasm-game-of-life, and define some constants that we will use when rendering
to the canvas:
import { Universe, Cell } from "wasm-game-of-life";

const CELL_SIZE = 5; // px
const GRID_COLOR = "#CCCCCC";
const DEAD_COLOR = "#FFFFFF";
const ALIVE_COLOR = "#000000";
Now, let's rewrite the rest of this JavaScript code to no longer write to the
<pre>'s textContent but instead draw to the <canvas>:
// Construct the universe, and get its width and height.
const universe = Universe.new();
const width = universe.width();
const height = universe.height();

// Give the canvas room for all of our cells and a 1px border
// around each of them.
const canvas = document.getElementById("game-of-life-canvas");
canvas.height = (CELL_SIZE + 1) * height + 1;
canvas.width = (CELL_SIZE + 1) * width + 1;

const ctx = canvas.getContext('2d');

const renderLoop = () => {
  universe.tick();

  drawGrid();
  drawCells();

  requestAnimationFrame(renderLoop);
};
To draw the grid between cells, we draw a set of equally-spaced horizontal lines, and a set of equally-spaced vertical lines. These lines criss-cross to form the grid.
const drawGrid = () => {
  ctx.beginPath();
  ctx.strokeStyle = GRID_COLOR;

  // Vertical lines.
  for (let i = 0; i <= width; i++) {
    ctx.moveTo(i * (CELL_SIZE + 1) + 1, 0);
    ctx.lineTo(i * (CELL_SIZE + 1) + 1, (CELL_SIZE + 1) * height + 1);
  }

  // Horizontal lines.
  for (let j = 0; j <= height; j++) {
    ctx.moveTo(0,                           j * (CELL_SIZE + 1) + 1);
    ctx.lineTo((CELL_SIZE + 1) * width + 1, j * (CELL_SIZE + 1) + 1);
  }

  ctx.stroke();
};
We can directly access WebAssembly's linear memory via memory, which is
defined in the raw wasm module wasm_game_of_life_bg. To draw the cells, we
get a pointer to the universe's cells, construct a Uint8Array overlaying the
cells buffer, iterate over each cell, and draw a white or black rectangle
depending on whether the cell is dead or alive, respectively. By working with
pointers and overlays, we avoid copying the cells across the boundary on every
tick.
// Import the WebAssembly memory at the top of the file.
import { memory } from "wasm-game-of-life/wasm_game_of_life_bg";

// ...

const getIndex = (row, column) => {
  return row * width + column;
};

const drawCells = () => {
  const cellsPtr = universe.cells();
  const cells = new Uint8Array(memory.buffer, cellsPtr, width * height);

  ctx.beginPath();

  for (let row = 0; row < height; row++) {
    for (let col = 0; col < width; col++) {
      const idx = getIndex(row, col);

      ctx.fillStyle = cells[idx] === Cell.Dead
        ? DEAD_COLOR
        : ALIVE_COLOR;

      ctx.fillRect(
        col * (CELL_SIZE + 1) + 1,
        row * (CELL_SIZE + 1) + 1,
        CELL_SIZE,
        CELL_SIZE
      );
    }
  }

  ctx.stroke();
};
To start the rendering process, we'll use the same code as above to start the first iteration of the rendering loop:
drawGrid();
drawCells();
requestAnimationFrame(renderLoop);
Note that we call drawGrid() and drawCells() here before we call
requestAnimationFrame(). The reason we do this is so that the initial state
of the universe is drawn before we make modifications. If we instead simply
called requestAnimationFrame(renderLoop), we'd end up with a situation where
the first frame that was drawn would actually be after the first call to
universe.tick(), which is the second "tick" of the life of these cells.
It Works!
Rebuild the WebAssembly and bindings glue by running this command from within
the root wasm-game-of-life directory:
wasm-pack build
Make sure your development server is still running. If it isn't, start it again
from within the wasm-game-of-life/www directory:
npm run start
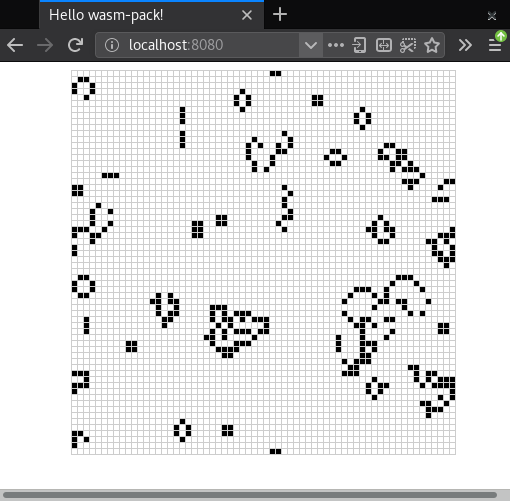
If you refresh http://localhost:8080/, you should be greeted with an exciting display of life!
As an aside, there is also a really neat algorithm for implementing the Game of Life called hashlife. It uses aggressive memoizing and can actually get exponentially faster to compute future generations the longer it runs! Given that, you might be wondering why we didn't implement hashlife in this tutorial. It is out of scope for this text, where we are focusing on Rust and WebAssembly integration, but we highly encourage you to go learn about hashlife on your own!
Exercises
-
Initialize the universe with a single space ship.
-
Instead of hard-coding the initial universe, generate a random one, where each cell has a fifty-fifty chance of being alive or dead.
Hint: use the
js-syscrate to import theMath.randomJavaScript function.Answer
First, addjs-sysas a dependency inwasm-game-of-life/Cargo.toml:# ... [dependencies] js-sys = "0.3" # ...Then, use the
js_sys::Math::randomfunction to flip a coin:# #![allow(unused_variables)] #fn main() { extern crate js_sys; // ... if js_sys::Math::random() < 0.5 { // Alive... } else { // Dead... } #} -
Representing each cell with a byte makes iterating over cells easy, but it comes at the cost of wasting memory. Each byte is eight bits, but we only require a single bit to represent whether each cell is alive or dead. Refactor the data representation so that each cell uses only a single bit of space.
Answer
In Rust, you can use the
fixedbitsetcrate and itsFixedBitSettype to represent cells instead ofVec<Cell>:# #![allow(unused_variables)] #fn main() { // Make sure you also added the dependency to Cargo.toml! extern crate fixedbitset; use fixedbitset::FixedBitSet; // ... #[wasm_bindgen] pub struct Universe { width: u32, height: u32, cells: FixedBitSet, } #}The Universe constructor can be adjusted the following way:
# #![allow(unused_variables)]
#fn main() {
pub fn new() -> Universe {
    let width = 64;
    let height = 64;

    let size = (width * height) as usize;
    let mut cells = FixedBitSet::with_capacity(size);

    for i in 0..size {
        cells.set(i, i % 2 == 0 || i % 7 == 0);
    }

    Universe {
        width,
        height,
        cells,
    }
}
#}
To update a cell in the next tick of the universe, we use the
setmethod ofFixedBitSet:# #![allow(unused_variables)] #fn main() { next.set(idx, match (cell, live_neighbors) { (true, x) if x < 2 => false, (true, 2) | (true, 3) => true, (true, x) if x > 3 => false, (false, 3) => true, (otherwise, _) => otherwise }); #}To pass a pointer to the start of the bits to JavaScript, you can convert the
FixedBitSetto a slice and then convert the slice to a pointer:# #![allow(unused_variables)] #fn main() { #[wasm_bindgen] impl Universe { // ... pub fn cells(&self) -> *const u32 { self.cells.as_slice().as_ptr() } } #}In JavaScript, constructing a
Uint8Arrayfrom Wasm memory is the same as before, except that the length of the array is notwidth * heightanymore, butwidth * height / 8since we have a cell per bit rather than per byte:const cells = new Uint8Array(memory.buffer, cellsPtr, width * height / 8);Given an index and
Uint8Array, you can determine whether the nth bit is set with the following function:const bitIsSet = (n, arr) => { const byte = Math.floor(n / 8); const mask = 1 << (n % 8); return (arr[byte] & mask) === mask; };Given all that, the new version of
drawCellslooks like this:const drawCells = () => { const cellsPtr = universe.cells(); // This is updated! const cells = new Uint8Array(memory.buffer, cellsPtr, width * height / 8); ctx.beginPath(); for (let row = 0; row < height; row++) { for (let col = 0; col < width; col++) { const idx = getIndex(row, col); // This is updated! ctx.fillStyle = bitIsSet(idx, cells) ? ALIVE_COLOR : DEAD_COLOR; ctx.fillRect( col * (CELL_SIZE + 1) + 1, row * (CELL_SIZE + 1) + 1, CELL_SIZE, CELL_SIZE ); } } ctx.stroke(); };